Home | Join! | Help | Browse | Forums | NuWorld | NWF | PoPo   
General Discussion » Pictures » Photoshop editting tips
KKama67 | Photoshop editting tips - Posted on 2006-11-13 16:19:36
| weblog | profile | gallery | new threads

How many people use photoshop or photoshop elements? This thread is dedicated to users of these programs. I am not an expert so these are just articles that I find on the web that may be useful to all NuTangers!!

View Page: 1 2 3 4
KKama67 | Getting rid of the Red Eye - Posted on 2006-11-13 16:22:43
| weblog | profile | gallery | new threads


The first thing to do is upload your photos into your computer, or scan them in if you're working from prints, then follow these simple steps.

1. To keep your original safe, make a copy of it by going to Image > Duplicate. Rename the copy if you wish, then close the original.

2. Open a duplicate window of the same image. Do this by going to Window > Documents > New Window in Photoshop 7, or View > New View in Photoshop 6 or earlier. Then zoom in on one of the windows so that an eye fills the window. Set the other window's magnification to 100%. Arrange the windows so you can see them both at the same time. This will enable you to work in close-up, but still see what the finished picture will look like. As it is the same picture in both windows, the 100% view will be updated automatically in real time.

3. Create a new layer.

4. Use the Eyedropper Tool to pick a colour from the iris of the eye - this will be fairly grey, with just a hint of the eye colour. Take the sample from as near to the red area as you can without picking up any of the reddish tint.

5. In the new layer, paint over the red area with this colour. Try various tools (brushes, pencils, Paint Bucket Tool, etc.) to achieve the desired effect. You'll have to experiment and see which one works best for you on each particular picture - a lot will depend on the photo's resolution. Be careful to avoid the "white of the eye" on pictures of people. Do small amounts at a time, that way you can easily undo anything that doesn't look right. If you paint over the pupil, use the Art History Brush to expose it again, or the Burn Tool to paint it in if it was obscured in the first place.

6. Go to Filters > Blur > Gaussian Blur and give the layer a blur of one or two pixels to soften the edges.

7. Now set the layer blend mode to saturation. If this makes the eye look too dull or grey, duplicate the layer and change the blend mode of this new layer to Hue. This should put some of the colour back. If the colour looks too strong, change the opacity of the Hue layer until it looks right.

8. When you're happy with the results, merge the layers down, save your work, and start again with the next eye.

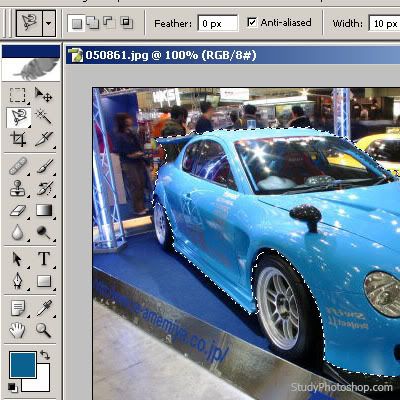
KKama67 | How to change an objects color - Posted on 2006-11-13 17:05:34
| weblog | profile | gallery | new threads

1. Open your photo [Ctrl+O]

2. Choose “Magnetic Lasso Tool” and select the object

3. Choose Image –> Adjustments –> Replace Colour. Top side of the settings panel is the colour before changes, bottom side — colour after changes. If some parts haven’t got into the change area — use “Add to Sample” tool.

4. As the result at ‘Photo Preview’ the object should be white, and just after that in the bottom side of the settings panel you should choose the necessary colour.

5. Remove the selection [Ctrl+D], and that’s it!

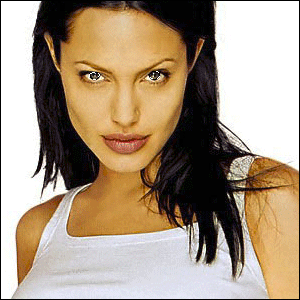
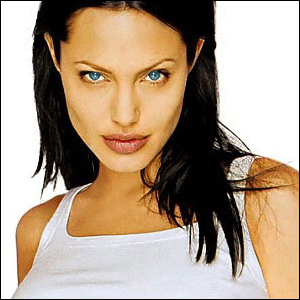
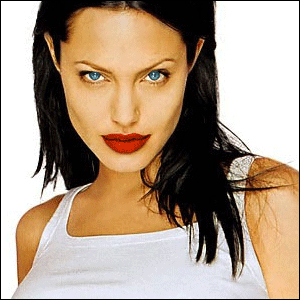
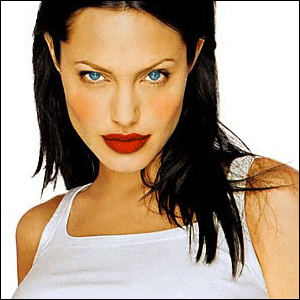
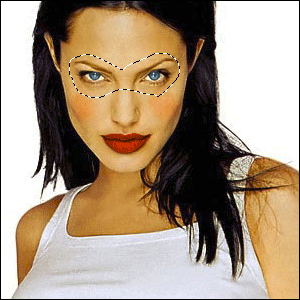
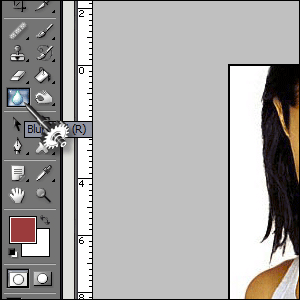
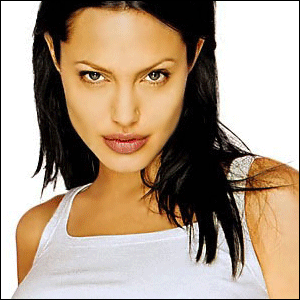
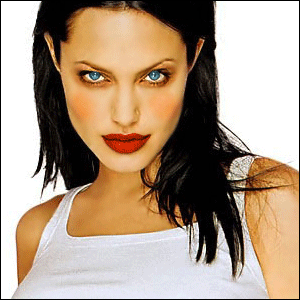
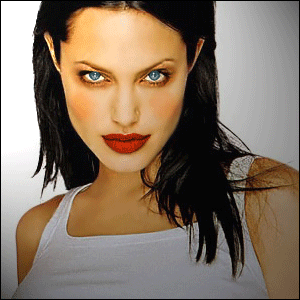
KKama67 | Add make-up to a photo - Posted on 2006-11-13 17:24:29
| weblog | profile | gallery | new threads

Add make-up to someone without it!

1. Open up a picture of a random person; (I used Angelina Joli/Voight)


2. Select the eyes and copy them onto a new layer;


3. Make them heaven-blue by pressing CTRL+U;


4. Select her lips and copy them onto a new layer;


5. Make them erotic-red by pressing CTRL+U;


6. Add with a red brush with a low opacity some blusher; (Look guys, I know what blusher is!)


7. Select her eyes and copy them onto a new layer;


8. Use the burn-tool to make some eye-shadow around the eyes;


9. Now get the blur-tool from the ToolsChest;


10. Blur the skin of the base-layer and make her/him (in my case her) skin look like a model;


11. Add all layers and you're done;


You can also add some lightning effects; (FILTER>RENDER>LIGHTNING EFFECTS)


randomjunk | Untitled - Posted on 2006-11-13 17:42:28
| weblog | profile | gallery | new threads

The makeup one is creepy.

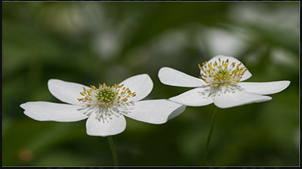
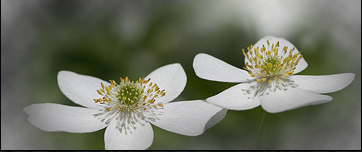
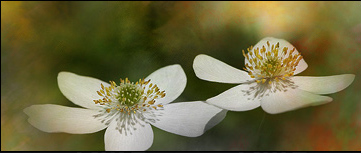
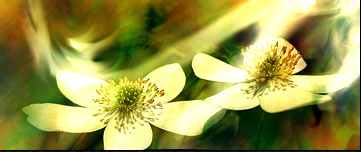
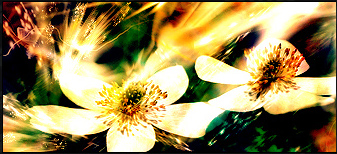
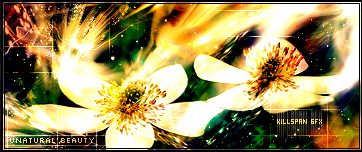
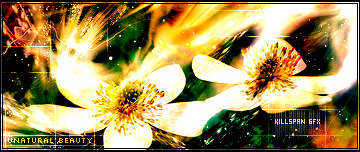
KKama67 | Flower Manipulation (the best one for Nutang layouts and banners) - Posted on 2006-11-13 17:45:30
| weblog | profile | gallery | new threads


1. Start off making your size. I like to keep most of my sigs at a traditional size, but you can use different sizes as long as it works with your photo. Then the first thing I do is I got to filter>render>clouds. Make sure the colors are black and white (We will color them later on)


2. Now we are going to go photo searching. Try to find a photo that you like, Something that you know will work well in a sig. That could be just about everything, from cars to nature, all the way to city streets. The only guidelines I would look for is that it's a good quality picture. For me I really like the nature style a lot so I used this photo of 2 flowers.


3. Cut the render out but don't do a square cut use the regular lasso and try to cut a circle of the photo. Then hit ctrl+x and then ctrl+v to paste it in your sig. Try to find the right dimensions for the photo that fit in the sig. Now we are going to lasso again but try to not get too close to the edges of the photo you cut, that way it will look smooth when you are done.


Now after you lassoed it again go to select>feather and make sure it's set to 20px and then you hit ok. This will smooth out the lasso even more. Then after that's done, you need to go to layer>add layer mask>reveal selection now it will looked blended in the sig as the pic shows.


4. Now I'm going to work on the brushing on the outsides of the photo. Try using colors that agree with the sig. I want to make this colorful, so I'm using some greens, yellows and oranges to make the work standout.


Ok now I started brushing using green color with rust and grunge. Then using diff layers I brushed using the yellow, orange and red. Keep in mind all of there layers are under soft light , so they will not overpower one another.


As you do this, I would recommend duplicating your photo layer once or twice, in order for it to be more visible as we add one more colors. You don't want it to be hidden under all the color layers that get put on. after this is done, now try doing a color balance layers are above all the other layers so it will give it the color effect you desire.


5. Go to layer>new>adjustments layer>brightness and contrast. Raise the contrast up 5-10Using the abstract brushes I created light radiating off the flowers.


6. Do some more color balance layers and brightness and contrast then keep on brushing with the colors you want.


7. Put one text and borders. I used a 3px border use blur effects on texts.


8. The last thing I do is go over my sig and check if there is anything else I want to edit.


And finally it's done here is my result.


changbang | Untitled - Posted on 2006-11-13 20:24:18
| weblog | profile | gallery | new threads

whooooaaa the flower one is cool!

bzhuo373 | Photoshop tutorials - Posted on 2006-11-13 20:42:40
| weblog | profile | gallery | new threads

This is precisely the type of blogs I like to see more of. Great job! You have my support 100%. I've been working with Flash MX pro so I'll try to post some things on my site someday.

yipi | Untitled - Posted on 2006-11-14 04:20:02
| weblog | profile | gallery | new threads

digg this :D

KKama67 | Blending using Layer Masks - Posted on 2006-11-14 12:09:39
| weblog | profile | gallery | new threads

1. Find a few images that you want to use, open them all in photoshop. Make sure you have a background layer if your dragging and dropping the images.

2. Now, you've got all your layers, set them out as if you were blending them (overlap them). Now, pick maybe the 2nd layer to work on.. Picked? Good, lets move on.

3. Click on the top layer (3rd image?) and you see the little eye, click that so you can't see that layer anymore. Now go back to your 2nd layer.

4. Go to your layers palette, and at the bottom you should see this click on that, then click on the thumbnail that appears on your 2nd layer.

5. Get your Brush tool (the soft rounded 1, set it to 100 opacity) Erase any uneeded areas (make sure in the colour is black in your toolbar)

6. Erased too much? not to worry, lower the brush opacity and switch the brush colour to white. Now go back over the outside of the image (see it's still there).

7. Repeat steps 4-6 for your other layers, remember to make that 1st layer visible again ;).

KKama67 | How to remove a pimple - Posted on 2006-11-14 12:20:49
| weblog | profile | gallery | new threads

How to remove a pimple using photoshop


1. Grab your picture. Blow up the selected area

2. Grab your clone stamp tool.

3. Hold down "Alt" on your keyboard and click directly below the pimple.

4. Now get a standered 21 px solid brush

5. Brush over your pimple, starting at the top left corner, striking across it diagonally

6. Voila! Acne Free! If it's a little darker, blur it somemore

View Page: 1 2 3 4

  Hot Topics Last Post Views Replies
Neopets
AmbyrJayde 2024-04-14 21:11:20 664229 25
Everyone... POST PICTURES!
sagittariusmoon 2016-05-29 18:12:19 4142222 241
Remember to Use the Invite Tool!
randomjunk 2016-02-11 15:53:30 8169 920
Any type of export thing?
AmbyrJayde 2016-01-08 14:17:54 918033 2
BATTLE THREAD: friendly bout.
invisible 2015-08-04 18:24:04 545 100
WE HAVE A MOBILE SITE!
invisible 2015-08-04 18:21:17 46 2
BATTLE THREAD: RANDOM, I CHOOSE YOU!
Midnight 2015-04-15 10:35:59 86 17
Can you help me get this started?
randomjunk 2014-10-29 22:40:39 81 13
Nutang Chatroom!
middaymoon 2014-09-24 23:35:11 289 48
Mr. and Mrs. Sank's Cake Topper Contest
ikimashokie 2014-01-05 15:43:13 65 10
A friend just released a quadruple album
dont-see 2013-10-08 04:02:38 1330903 2
My profile pic won't change..
sagittariusmoon 2013-07-04 09:05:58 12195 2
Shhh, it's a secret!
sagittariusmoon 2013-07-03 14:09:05 361 14
HEY PALS! Lets get to know one another a little better.. The NuTangian Challenge!!
sagittariusmoon 2013-07-03 10:43:38 49644 83
NUTANGIAN COUNCIL MEETING
Midnight 2013-04-29 08:31:49 170 21
February Entry-a-Day Challenge!
randomjunk 2013-03-02 19:51:59 175 21

NuTang.com • The Ultimate Weblog Community

NuTang is the first web site to implement PPGY Technology. This page was generated in 0.006seconds.

  Send to a friend on AIM | Set as Homepage | Bookmark Home | NuTang Collage | Terms of Service & Privacy Policy | Link to Us | Monthly Top 10s
All content � Copyright 2003-2047 NuTang.com and respective members. Contact us at NuTang[AT]gmail.com.